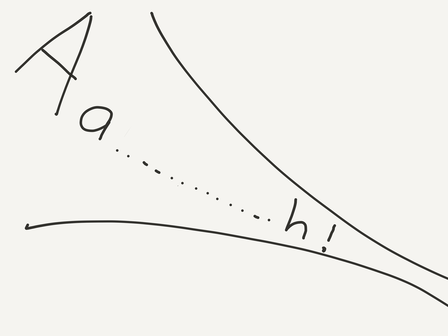
Step 1
Introduce the tile. Discuss how symbols on the tile may be interpreted. E.g.
- Notice that sound has pitch: top of the tile would be high pitched. Diagonal lines downwards can suggest pitch drop. So this tile could be performed starting on a high pitched “ah” and dropping the voice to a very low pitch.
- Notice that sound has volume. The larger letters and funnel shape suggests loud, the smaller letter and narrowing funnel shape suggests a decrescendo in sound.
- Notice that the tile has a top and bottom (for high and low), and left and right (for sound progression).
Step 2
This lesson can be introduced in two ways:
- Provide ready-made sound tiles
Students use the tiles to generate a story. They order the set of tiles in any order, associate an event, time or place to the tile, generate and hone the narrative, decide on the performance of the graphic notation tile (voice, instrument, sound maker) and assemble the composition for narration, voice, instruments and sound effects. - Provide the narrative
Provide a short narrative or poem. Students generate a set of sound tiles to indicate sound happenings in the story. Produce the tiles, order the tiles, perform the narrative and voice, instruments and sound effects.

 RSS Feed